
This article is to provide you, the reader, the knowledge on how to properly create an Exchange 2013 Relay Connector.
In Exchange 2013, I am utilizing a multi-role server that has both the Client Access Server and Mailbox Server roles. We’ll want to head to the mail flow section in the Exchange Administration Center (EAC) that you can access by going to https://OWA.domain.com/ECP.

Once in this mail flow section, we’ll click the tab called receive connectors which will allow us to see all receive connectors that exist.

As you can see, there are connectors for FrontendTransport and connectors for HubTransport. FrontEndTransport belongs to the Client Access Server Role and the HubTransport role belongs to the Mailbox Server role.
Let’s take a look at the “Default B-E15DAG1” receive connector that belongs to the HubTransport role as well as the “Default Frontend B-E15DAG1” that belongs to the FrontendTransport role.
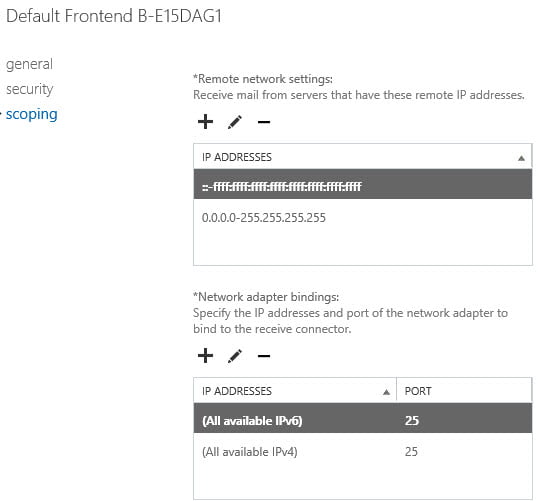
Taking a look at the “Default FrontEnd B-E15DAG1”, we can see that the connector listens on port 25 as we would expect.
Taking a look at the “Default B-E15DAG1” receive connector, we can see it listens on port 2525 which is something we haven’t seen before.

All mail flow should come into the Frontend Transport which then delivers it to the appropriate mailbox server where the mailboxes exist. On a multi-role server, these two roles cannot utilize the same ports as they are two different services. What this means is, when creating a relay connector, this connector must be created on the Client Access Server role that owns the Frontend Transport because this service is the service that owns port 25. If you try to create a receive connector on the Mailbox Server role that owns the HubTransport service, mail flow may work temporarily, but it will eventually fail due to both the FrontendTransport and HubTransport services fighting each other for port 25. Obviously if the Client Access Server and Mailbox Server roles are on different servers, it’s not an issue.
To create our relay connector, we’ll choose the + symbol to create a new Receive Connector.

Give the connector a name and be sure to choose Frontend Transport and Custom. Click Next.

The default settings here are fine. We want port 25 due to what I mentioned above. Click Next.

In the remote network settings, it is important to ensure that you remove 0.0.0.0-255.255.255.255. We want to explicitly define what servers are allowed to relay to ensure our server does not turn into an open relay for everybody. In my case, I am going to add 192.168.50.2 which may be a printer, custom application, etc… But the server that owns 192.168.50.2 would need to relay. Once this is done, click Finish.

Once the relay connector is created, open its properties, go to security, and make sure you check Anonymous Users.

So what really happens when you place a check mark in the Anonymous users group in the above screenshot? A lot of people are afraid to place a checkmark in that box in fear that anonymous users will be able to relay off your Exchange Server. This is NOT the case.
When you place a checkmark in that box, the following permissions are given to the Anonymous Logon group:
- Ms-Exch-SMTP-Submit
- Ms-Exch-SMTP-Accept-Any-Sender
- Ms-Exch-SMTP-Accept-Authoritative-Domain-Sender
- Ms-Exch-Accept-Headers-Routing
So, as you can see, there is no Ms-Exch-SMTP-Accept-Any-Recipient permission added by default. Because of this, users will NOT be able to relay off your Exchange Server by default.
To activate Anonymous users to use this connector for relaying, you must issue the following command: Get-ReceiveConnector “Receive Connector Name” | Add-ADPermission -User “NT AUTHORITY\ANONYMOUS LOGON” -ExtendedRights “Ms-Exch-SMTP-Accept-Any-Recipient”
The command should be easy enough to read, but what it essentially does is retrieve the receive connector that you created, add a permission into Active Directory for the Anonymous Logon group, and assign that group the Ms-Exch-SMTP-Accept-Any-Recipient permission for that group on that connector. Once this is done, any server IPs you added to the Remote Network settings will be allowed to relay off your server utilizing port 25.

Now you may be thinking, why should I create this new connector? Well, Exchange will always look to see how specific you are on a connector. So let’s say we have a SharePoint Server at 192.168.119.150. We would create a relay connector and allow ONLY 192.168.119.150 to relay. So when Exchange receives SMTP from an address of 192.168.119.150, it will see there are a few connectors. One being the Default Receive Connector and one being the Relay Connector. The Default Receive Connector allows connections from any IP Address while the Relay Connector only allows connections from 192.168.119.150. Because you explicitly set the address on your Relay Connector, that is given higher preference in serving that SMTP connection from SharePoint and your SharePoint Server will now be able to relay off of Exchange (even though you can configure SharePoint to authenticate, but still just giving an example).
Now, for servers that will have a lot of relay traffic, there are some more steps you need to do on your Receive Connector. If you see that you have mail flow issues where things periodically work with relaying and sometimes they don’t, it’s recommended to run the following commands on your Relay Connector.
Set-ReceiveConnector -identity “Relay Connector Name” -TarpitInterval 00:00:00
Set-ReceiveConnector -identity “Relay Connector Name” -ConnectionTimeout 00:30:00
Set-ReceiveConnector -identity “Relay Connector Name” -ConnectionInactivityTimeout 00:20:00
Set-ReceiveConnector -identity “Relay Connector Name” -MaxAcknowledgementDelay 00:00:00
Set-ReceiveConnector -identity “Relay Connector Name” -MaxInboundConnection 10000
Set-ReceiveConnector -identity “Relay Connector Name” -MaxInboundConnectionPercentagePerSource 100
Set-ReceiveConnector -identity “Relay Connector Name” -MaxInboundConnectionPerSource unlimited
So in my case, I would run the following command which would allow me to do Get-ReceiveConnector and pipe into Set-ReceiveConnector to make all the modifications in one command:
Get-ReceiveConnector -Identity “Relay Connector Name” | Set-ReceiveConnector -TarpitInterval 00:00:00 -ConnectionTimeout 00:30:00 -ConnectionInactivityTimeout 00:20:00 -MaxAcknowledgementDelay 00:00:00 -MaxInboundConnection 10000 -MaxInboundConnectionPercentagePerSource 100 -MaxInboundConnectionPerSource unlimited

If you are wondering what the default settings were, I ran the following to view the defaults before running Set-ReceiveConnector.


I still use this article to get the ps command like every other week lol
Thanks, great writeup, helped me quite a lot today!
Thanks Elan, great post – clear and easy to understand. I was almost there, just missing the last step!
Carl http://oxfordsbsguy.com
Hi Robert, thanks for your Tutorial, may you please assist me if possible
I've currently installed Exch 2013 on a Exch 2010 environment
Exch 2013 – I'm able to send internally/externally without any issues but not receiving anything except from mailboxes on the same exch 2013 server
I have not configured and Send or Receive connectors as yet
Send Connectors available reside from the existing exch 2010 environment, I just added the new exch 2013 on them
There a couple of Receive connectors residing on the exch 2010 environment but not yet migrated over
How would I go about making sure that I can send/receive from both exch 2010 and 2013 and vise versa
This post saved me! I kept creating the receive connector with the Hub Transport selected and the Transport service kept stopping. Problem solved! Thanks!
Elan, you posted a "simple script" for enabling multiple users from a .csv script, will that same script work with Exch 2013? Thank you………Noob!
Hello,
Great article. I am however a little confused on what the difference is on creating a receive/relay connector on CAS vs. creating on Mailbox. Can you help clarify a few things?
If you wanted to relay and send mail to external recipients for device/application notifications, I would imagine you would want to create the connector using the Front-End Transport role on CAS, correct? Would relaying external also work if connector was created on Mailbox? What’s the difference??? Is the only advantage of using the mailbox server for the receive connector is for the option of having the mail queued?
What if I only wanted to relay internally? Which server or role should I use?
Lastly, what if the applications needing to relay external use different ports other than port 25? Does it matter where it gets created or same procedure?
great explanation thanks for your work !
Excellent post
Great post. Was having an issue with SCOM notifications being dropped due to the submission rate being to high. This cleared up the issue!
Hi, Thanks for this step by step guide.
I would also recommend running the following command in order to allow more than 1 Anonymous connection at a time:
Set-ThrottlingPolicy -anonymousmaxconcurrency 10 on the default ThrottlingPolicy
Elan thank you very much for your in-depth explanation of this issue resolution. I have been trying to do this for a month and unable to figure it out since our upgrade to Exch 2013.
Is it possible to setup another connector (on port 25) to allow for smtp auth relay as well? Basically, i want to allow printers or other devices/apps to be able to send a user/pass to send email so i don't have to enter hundreds of IP's in my allow list as well as keep the list up to date, not to mention allow them to use dhcp if possible. Then i can also use another connector with the method you have posted here to allow for those other devices/apps that can't use smtp auth and i will allow those to relay anonymously by IP.. does that make sense?
Yes, that makes sense. If the client is authenticating, all you need to do is have the Exchange User permission checked. This will allow them to utilize that connector. Then for the devices that cannot authenticate, you can simply just use the relay connector as I have outlined in this article.
thanks for the reply.. now i get to ask details ;-) so, this is on a standalone cas server with the internal relay connector as you have outlined here and the other default connectors as they come installed. Since the default connector and the internal relay connector both use port 25, how do i setup a new connector to use exchange user authentication on port 25 without having to specify by IP address and have it not conflict with the default connector? I could allow the default connector to relay anonymous, but then since that is setup to allow anonymous permission group (by default), would allow anyone to connect using pretty much any method right? I was thinking that maybe i would setup a new connector with the exchange user permission group assigned and then setup broad subnets that are used internally (probably 30 of them, but still a lot less than setting up all the devices by IP's). Would this work and still allow the devices that are using anonymous relay to be specified by IP on the internal relay connector? From what i understand, the more specific the IP match on the receive connectors will determine which method it uses. Do you think this would be the proper method to do this or am i making this too difficult?
Your a legend i was adding it manually without the command, now it finaly works u have no idea how much time i spend and it was this silly command i was missing ARWRR@#$##$@!!
anyways thanks!
Is using "Exchange servers" as permission group and "Externally secured" for authentication still a valid option for creating a relay connector?
You need to use either Anonymous as I outlined or you can use Externally Secured. The problem with Externally Secured is anything that hits that connector also bypasses antispam rules. With Externally Secured, you're providing more privileges than are necessary. Principle of Least privilege applies here. I recommend using the Anonymous Group method I have outlined. As always, it is imperative that you restrict what IPs can hit your connector or you will turn your server into an open relay.
EXACTLY what we needed to get mail flowing on our internal phpbb. Thank you so much!
hello,
I have configured Exchange 2013 with both roles Mailbox and CAS. Users are able to send and receive mails from owa web console, but when the mailbox user is setup with office outlook then, they can't send mails and get error: Server error: '550 5.7.1 Unable to relay'. This error is shown in office outlook 2007 application only not in web mail (owa)….I tried creating new receive connector following your article but I couldn't create it because port conflict with other connectors.
Do you have instructions for installations with split CAS and MB roles? I'm having a tough time relaying from apps and printers through a connector I set up on the CAS. It seems to deliver to local addresses but not the Internet (through a Smarthost). The other problem is that I cannot test, it fails with a 5.7.1 relay error even though I have the proper IP address listed.
Thanks for this article. Did wonders trying to email reports to external domains from within Crystal Reports in a Exchange 2013 setting.
I can't thank you enough for this post! I just turned on Exchange 2013 for a client over the weekend, then added the Anonymous Receive Connector for their scanners. I noticed that later in the day, Exchange stopped receiving mail. Major panic, since this client will be in Monday morning expecting their mail to be up and running! Bottom line…created the Receive Connector as a Hub Transport Service instead of a Frontend Transport Service. Had already deleted the first connector to see if I Exchange would start receiving mail again (it did!). Recreated the Anonymous Relay Connector as a Frontend Transport Service…and…success! Thank you so much for taking the time to create this blog. It saved my life!!
You're welcome. Thanks for posting!
hey,
great job,,,
i have few question.. who is sending mail out side the organization and will receive mail from outside for organization ?
CAS or Mailbox ?
and
1 if exchange 2013 mailbox server will send e-mail externally and internally , then in our reverse proxy TMG etc we will mention mailbox server ip address for outside right ?
2 while receiving mail what we will do same we will create d-NAT rule to mailbox ?
3 and if we want to proxy via Cas then we will put CAS server ip not the mailbox in TMG etc right ?
4 while receiving mail what we will do same we will create d-NAT rule to CAS or Mailbox server ?
Regards
Great post, thanks! If I wanted to setup an Exchange 2013 server as a dedicated private relay, could I get away with just installing the CAS role and skip the mailbox role? I ask because our mailboxes will be on Office 365, but we have copiers and apps on the LAN that need to relay.
Thank you for your time,
MJL
Just install a co-located CAS/MBX Server.
Okay, thanks for your reply. I was hoping to get away with just installing the CAS role to keep server resource usage down. Of course, I can't imagine the store.exe process will use much RAM if there aren't any mailboxes on the server. :-)
Thanks!
MJL
Well, store.exe still likes to eat ram. But, it releases it as needed so you should be good.
No need to install a full Exchange server just to relay mail. A Windows Server with IIS SMTP will do the trick! http://support.microsoft.com/kb/2600912
This is true. But this post is for companies that are currently using Exchange.
Sure, but I was replying to MJLs post regarding a relaying server when using Office 365. I assumed that he/she didn't have a local Exchange environment and in that case an IIS server would do just fine :)