
The purpose of this article is to demonstrate the following two capabilities:
- Leverage an Azure Runbook to connect to Exchange Online via an Azure Active Directory Application to run Exchange Online PowerShell Commands
- Leverage an Azure Runbook to connect to Microsoft Graph via an Azure Active Directory Application to Send Email via Exchange Online
We will walk through the following steps to accomplish the above 2 capabilities:
- Create an Automation Account leveraging a Managed Identity
- Create an Azure AD Application with the necessary Exchange Online API Permissions
- Create a certificate and assign the certificate to the Azure AD Application
- Assign Exchange Online Permissions to our Azure AD Application
- Configure our Automation Account to Connect to Exchange Online
- Configure our Automation Account to Connect to Microsoft Graph to Send an E-Mail
Create an Automation Account leveraging a Managed Identity
Create an Automation Account and specify the Resource Group, Automation Account Name, and Region the Automation Account will be created in.
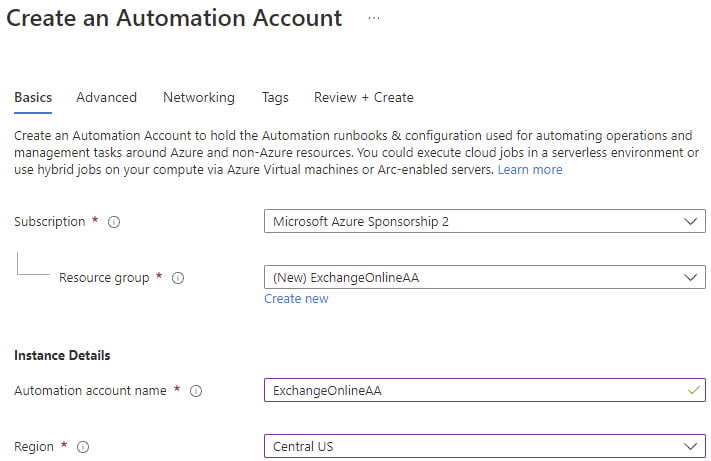
Create a System assigned Managed Identity. Click Review + Create and create the Automation Account.

Assign Reader Permissions against your Subscription for your Automation Account’s Managed Identity so the Runbook can login to Azure to obtain and execute the Runbook. I am choosing to do this against my Tenant Root Management Group. You can choose to scope this to any Management Group, Subscription, or Resource Group. The scope selected must include the Automation Account.
In the Scope you select, choose Access control (IAM), click Add and choose Add role assignment.

Select Reader.

Click Next. Select Managed Identity.

Click Select members, choose Automation Account for Managed Identity, and select your Automation Account.

Verify the permissions are correct and click Review + assign.

Create an Azure AD Application with the necessary Exchange Online API Permissions
In Azure Active Directory, create an Application.

Assign a name for the application and specify the application will only leverage accounts in your own tenant. Click Register.

In the Application, go to Manifest, and modify the resourceAppID, as well as the id and type within resourceAccess to match the below. Choose Save.

Here is a snippet of the code:
"requiredResourceAccess": [
   {
      "resourceAppId": "00000002-0000-0ff1-ce00-000000000000",
      "resourceAccess": [
         {
            "id": "dc50a0fb-09a3-484d-be87-e023b12c6440",
            "type": "Role"
         }
      ]
   }
],
Verify Exchange.ManageAsApp API permissions are present.

Grant Consent by clicking “Grant admin consent for <TenantName>”

Verify “Granted for Shudnow” is displayed under Status.

Create a certificate and assign the certificate to the Azure AD Application
Create a Self-Signed Certificate on your local machine (or any machine) using the following code and be sure to change the DnsName:
# Create certificate
$mycert = New-SelfSignedCertificate -DnsName "shudnow.io" -CertStoreLocation "cert:\CurrentUser\My" -NotAfter (Get-Date).AddYears(1) -KeySpec KeyExchange

# Export certificate to .pfx file
$mycert | Export-PfxCertificate -FilePath mycert.pfx -Password $(ConvertTo-SecureString -String "P@ssw0rd1234" -AsPlainText -Force)

# Export certificate to .cer file
$mycert | Export-Certificate -FilePath mycert.cer
Let’s take the certificate and attach it to our Azure AD Application. In your Azure AD Application, choose Certificates & secrets, select Certificates, and choose Upload certificate.

Select the .cer file that was exported. Click Add.

Verify the certificate was added.

Assign Exchange Online Permissions to our Azure AD Application
In Azure Active Directory, open Roles and administrators and search for Exchange administrator.

Click Exchange administrator and then Add assignments.

In “Select member(s)”, click No member selected and choose your Azure AD Application.

If you’re like me and you named your Automation Account with a Managed Identity and your Azure AD Application the same name, you may be wondering which is which. In Azure AD, if you go to App Registrations, find your Azure AD Application, you will see the Application (client) ID. Even if you named them differently, you will still need the Application (client) ID for a later step for the Runbook code itself. Please copy the ID for use later.

Choose Select and finish assigning the permission. Verify the assignment has been added.

Configure our Automation Account to Connect to Exchange Online
In our Automation Account, go to Certificates, and upload the PFX of our self-signed certificate.

Verify the certificate has been added.

In your Automation Account, click Modules, and then click Add Module.

Choose “Browse from gallery” and then click “Click here to browse from gallery.”

Search for the ExchangeOnlineManagement Module.

Select the Module and choose your Runtime version and click Import.

Create a Runbook by providing a Name, PowerShell as the Runbook Type, and your Runtime version. Click Create.

We will, for now, use the following Runbook Code.
# Ensures you do not inherit an AzContext in your runbook
Disable-AzContextAutosave -Scope Process

# Connect to Azure with system-assigned managed identity
$AzureContext = (Connect-AzAccount -Identity).context

# set and store context
$AzureContext = Set-AzContext -SubscriptionName $AzureContext.Subscription -DefaultProfile $AzureContext

# Obtain a copy of the certificate
$ExchangeOnlineCertThumbPrint = (Get-AzAutomationCertificate -ResourceGroupName "ExchangeOnlineAA" -AutomationAccountName "ExchangeOnlineAA" -Name "ExchangeOnlineCert").Thumbprint

# Import the ExchangeOnlineManagement Module we imported into the Automation Account
Import-Module ExchangeOnlineManagement

# Connect to Exchange Online using the Certificate Thumbprint of the Certificate imported into the Automation Account
Connect-ExchangeOnline -CertificateThumbPrint $ExchangeOnlineCertThumbPrint -AppID "<AppIDHere>" -Organization "shudnow.onmicrosoft.com"

# Get the Mailbox for Elan Shudnow
$Mailboxes = Get-Mailbox -Identity "Elan Shudnow"

# Output the Results for the Mailbox
Write-Output $Mailboxes
Click on Test pane so that we can test the Runbook.

sdfd

Voila, we have a successful Runbook Execution!
Leverage Microsoft Graph to send an e-mail message.
Now we’ll want to leverage Microsoft Graph to send an e-mail.
The first thing we’ll need to do is import the following three Modules into the Automation Account:
- Microsoft.Graph.Auth
- Microsoft.Graph.Mail
- Microsoft.Graph.Users.Actions
I am not going to show again how to import Modules from the Gallery as I demonstrated this earlier with the ExchangeOnlineManagement Module.


We’ll want to add a couple new Azure AD Application API Permissions. For this, within API Permissions, select Microsoft Graph.

Choose Application Permissions.

Scroll down to Mail and choose Mail.ReadWrite and Mail.Send and click Add.

Click Grant admin consent and verify you permissions look as follows.

The Runbook Code we will initially test with is as follows just to ensure we are successfully connecting to Microsoft Graph via the Azure AD Application.
# Ensures you do not inherit an AzContext in your runbook
Disable-AzContextAutosave -Scope Process

# Connect to Azure with system-assigned managed identity
$AzureContext = (Connect-AzAccount -Identity).context

# set and store context
$AzureContext = Set-AzContext -SubscriptionName $AzureContext.Subscription -DefaultProfile $AzureContext

# Obtain a copy of the certificate
$ExchangeOnlineCertThumbPrint = (Get-AzAutomationCertificate -ResourceGroupName "ExchangeOnlineAA" -AutomationAccountName "ExchangeOnlineAA" -Name "ExchangeOnlineCert").Thumbprint

# Import the Microsoft.Graph.Authentication Module we imported into the Automation Account
Import-Module Microsoft.Graph.Authentication

# Import the Microsoft.Graph.Mail Module we imported into the Automation Account
Import-Module Microsoft.Graph.Mail

# Connect to Microsoft Graph using the Certificate Thumbprint of the Certificate imported into the Automation Account
Connect-MgGraph -ClientId <Client ID> -TenantId <Tenant ID> -CertificateThumbprint $ExchangeOnlineCertThumbPrint
$Details = Get-MgContext

Write-Output $Details
The Client ID is the Azure AD Application’s ID you recorded earlier. Be sure to update the Client ID and the Tenant ID. To get the Tenant ID, go to Azure Active Directory, click Properties, and record the Tenant ID.

Let’s test the execution of our Runbook to ensure we are able to connect to Microsoft Graph and get our Tenant Name back as the Output.
Voila, we have another successful execution. This time via Microsoft Graph and we can see we have Mail.ReadWrite and Mail.Send.

Now let’s modify our code to actually send an e-mail. Thank you to Mike Crowley for publishing some code to send e-mail via Microsoft Graph. His article is here: Sending Email with Send-MgUserMail (Microsoft Graph PowerShell) | Mike Crowley’s Whiteboard.
Our code is as follows:
# Ensures you do not inherit an AzContext in your runbook
Disable-AzContextAutosave -Scope Process

# Connect to Azure with system-assigned managed identity
$AzureContext = (Connect-AzAccount -Identity).context

# set and store context
$AzureContext = Set-AzContext -SubscriptionName $AzureContext.Subscription -DefaultProfile $AzureContext

# Obtain a copy of the certificate
$ExchangeOnlineCertThumbPrint = (Get-AzAutomationCertificate -ResourceGroupName "ExchangeOnlineAA" -AutomationAccountName "ExchangeOnlineAA" -Name "ExchangeOnlineCert").Thumbprint

# Import the Microsoft.Graph.Authentication Module we imported into the Automation Account
Import-Module Microsoft.Graph.Authentication

# Import the Microsoft.Graph.Mail Module we imported into the Automation Account
Import-Module Microsoft.Graph.Mail

# Connect to Microsoft Graph using the Certificate Thumbprint of the Certificate imported into the Automation Account
Connect-MgGraph -ClientId <Client ID> -TenantId <Tenant ID> -CertificateThumbprint $ExchangeOnlineCertThumbPrint

# E-mail Recipient
$emailRecipients   = @(
	'[email protected]'
)

# E-mail Sender
$emailSender  = '[email protected]'

# E-mail Subject
$emailSubject = 'Sample Email'

# Function to Convert Recipient E-mail into Object needed for Send-MgUserMail
Function ConvertTo-IMicrosoftGraphRecipient {
	[cmdletbinding()]
	Param(
		[array]$SmtpAddresses
	)
	foreach ($address in $SmtpAddresses) {
		@{
			emailAddress = @{address = $address}
		}
	}
}

# Convert Recipient E-mail into Object needed for Send-MgUserMail
[array]$toRecipients = ConvertTo-IMicrosoftGraphRecipient -SmtpAddresses $emailRecipients

# Customize the message
$emailbody  = @{
    content = '<html>hello <b>world</b></html>'
    ContentType = 'html'
}

$body += @{subject      = $emailSubject}
$body += @{toRecipients = $toRecipients}
$body += @{body         = $emailBody}

$bodyParameter += @{'message'         = $body}
$bodyParameter += @{'saveToSentItems' = $false}

# Send E-mail
Send-MgUserMail -UserId $emailSender -BodyParameter $bodyParameter
Let’s execute our Runbook again with these latest code changes.

No errors. This is a good sign. Let’s go check hotmail…

Voila! Everything worked as expected.
Conclusion
In this article, we learned how to leverage an Azure Automation Account for the purpose of executing a Runbook to leverage an Azure Active Directory application to connect to Exchange Online using a certificate. We then looked at how to leverage a Runbook to execute Microsoft Graph to send e-mails via Exchange Online.
If you have any questions, feel free to comment.

Why do you need a managed identity in this scenario?
Hi Jack, in the article, it mentions, “Assign Reader Permissions against your Subscription for your Automation Account’s Managed Identity so the Runbook can login to Azure to obtain and execute the Runbook. I am choosing to do this against my Tenant Root Management Group. You can choose to scope this to any Management Group, Subscription, or Resource Group. The scope selected must include the Automation Account.”
Hope this answers your question.
Hi Elan
I have this working with powershell 5.1 runtime but the connection to exchange keeps resetting. I tried 7.1 and get newtonsoft error, looks like a library conflict as it wants newtonsoft v13.0.0 but can’t find it. Powershell 7.2 runtime gives me a different issue. This time I get: “no certificate found for the given certificatethumbprint” when connecting to exchange.
Have you seen any of these issues? Any suggestions?
Thanks
Andrew
Hi Andrew, I’ve heard of others having issues with 7.1. This seems to only work with 5.1. I personally haven’t tried with 7.1 as 7.1 is in Preview for Runbooks. As far as the connection being reset, I’ve had a few people run this on 5.1 without issue, including myself, so I’m not sure what the connection resetting problem is.
Hi Elan
thanks for the response. I just got this working on 7.2! There is a github thread here: https://github.com/microsoftgraph/msgraph-sdk-powershell/issues/1439 that describes the module conflict issue with Newtonsoft in 7.1 and recommends to use 7.2.
Now the difference with 7.2 is that the thumprint switch is not working (at least for me) with Connect-ExchangeOnline. This worked OK in 5.1 but not 7.2 With 7.2 I was able to retrieve the thumbprint for the cert, but when I pass the thumprint as an argument to Connect-ExchangeOnline cmdlet, it complains that it cannot find a valid certificate for the thumbprint. I finally figured out that I can retrieve the entire cert rather than thumprint and pass this instead to Connect-ExchangeOnline. This works every time and no resets for me.
Here is what I did. I hope it helps you or someone else reading this in the future:
$ExchangeOnlineCert = (Get-AutomationCertificate -Name “MyCertName”)
Connect-ExchangeOnline -Certificate $ExchangeOnlineCert -AppID “” -Organization “xyz.onmicrosoft.com”
Notice that you have to use Get-AutomationCertificate to get the cert. Get-AzAutomationCertificate gets information about the cert e.g. the thumbprint but not the cert itself.
The only doubt I have after all this is: What is the point? Managed Identities were supposed to remove the need to worry about certificates and their expiry. Yes I know I can get a full cert that is not self-signed and will last a lot longer, but it will eventually expire. and the job will not run until it gets a new certificate.
Hi Elan
I just worked my way through this and it worked. I initially tried the 7.1 runtime but I got a Newstonsoft error from the exchangeonline module. I figured there must be some dependency issue with the 7.1 runtime, so I switched to 5.1 and this works OK.
I have a question on the certificate that is attached to the Azure Applicatioin. Does a new certificate have to be created and uploaded every year? It looks like it, which is a shame as I will have to build that requirement into the app maintenance.
Thanks for sharing.
– Andrew
Yes, the certificate does need to be renewed and updated in the Azure AD App and the Automation Account.
Thank you so much for this tutorial. This automation save me 10 minutes everyday in my job. A year would be a lot!
There is only 1 thing that I was confused is the way you name the same “ExchangeOnlineAA” for ResourceGroup, App and Automation Account. It took me 4 hours and I gave up then came back and finally understood that the ResourceGroup in my environment has different name. I know this is so obvious but because this is totally new to me so after reading steps my mind became ineffective. Maybe this just happens to me.
Anyway, I make some small changes to your code here, hopefully it would help someone ‘newbie’ like me :)
Again, thank you very much for the tutorial, it helps my job a lot!
# Ensures you do not inherit an AzContext in your runbook
Disable-AzContextAutosave -Scope Process
# Connect to Azure with system-assigned managed identity
$AzureContext = (Connect-AzAccount -Identity).context
# set and store context
$AzureContext = Set-AzContext -SubscriptionName $AzureContext.Subscription -DefaultProfile $AzureContext
# Obtain a copy of the certificate
$ExchangeOnlineCertThumbPrint = (Get-AzAutomationCertificate -ResourceGroupName “” -AutomationAccountName “AutomationAccountName” -Name “ExchangeOnlineCert”).Thumbprint
# Import the ExchangeOnlineManagement Module we imported into the Automation Account
Import-Module ExchangeOnlineManagement
# Connect to Exchange Online using the Certificate Thumbprint of the Certificate imported into the Automation Account
Connect-ExchangeOnline -CertificateThumbPrint $ExchangeOnlineCertThumbPrint -AppID “” -Organization “”
# Get the Mailbox for Elan Shudnow
$Mailboxes = Get-Mailbox -Identity “Elan Shudnow”
# Output the Results for the Mailbox
Write-Output $Mailboxes
Happy it helped! Thank you for commenting.